Good mushroom collecting starts before you pick anything. The most important information comes from the moment you first see the mushroom in its environment—how it sits in the habitat, what it’s growing from, and what the surrounding trees and plants reveal about the conditions it prefers. Paying attention to these details gives you a stronger identification later and a clearer, more complete record of your find.
Photography In the Field
Start your collection by photographing the mushroom exactly as you found it. Mushrooms can change shape, color, and texture as soon as they’re handled, so capturing their natural appearance is one of the most critical steps. These first photos become the anchor for everything you record afterward. For more information on uploading photos for online identification, review our iNaturalist page.
Helpful images include:
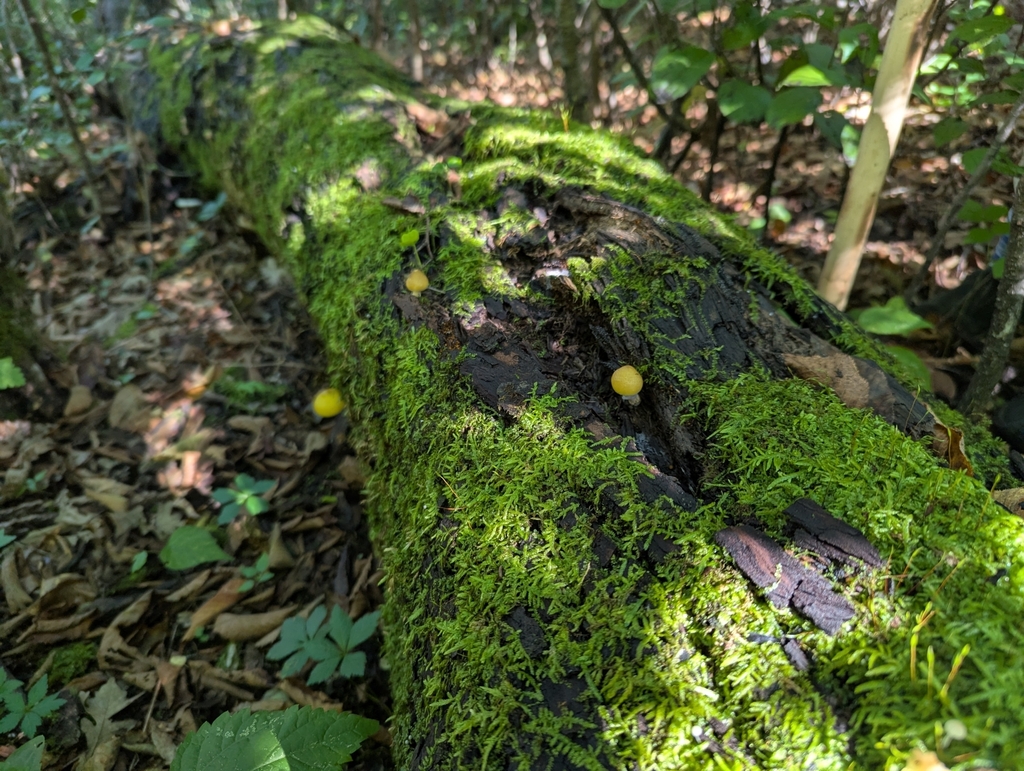
- the mushroom in place, showing how it sits in its habitat (in-situ)
- close views of the cap, underside, stem, and base
- a wider shot showing the surrounding trees, plants, and substrate
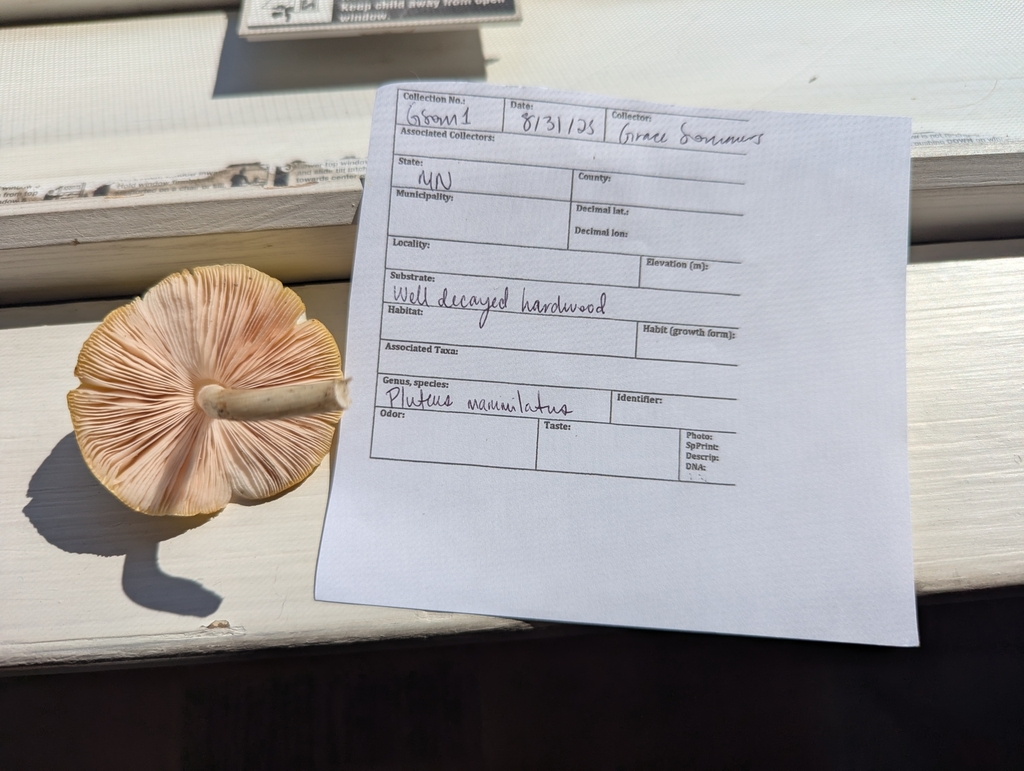
- a photo with your field slip, if you’re using one, to help track specimens
Images courtesy of Grace Sommers / gsom iNaturalist
Key Features to Pay Attention To
A well-documented collection includes more than the mushroom itself. The surroundings, the surface it grows from, and the structures you see when you look closely all contribute to a confident identification. These details are simple to observe, and with practice, they become second nature. Key things to note include:
- Habitat — forest, prairie, lawn, moss, bog, or wetland
- Substrate — soil, leaf litter, hardwood, conifer, or buried wood
- Nearby trees — such as oak, maple, birch, pine, or spruce
- Cap — color, shape, and surface texture
- Underside — gills, pores, ridges, or teeth
- Stem — color, texture, whether it’s hollow or solid, and any ring or veil remnants
- Base — bulbs, cups, volvas, or root-like structures
- Color changes — bruising or staining when touched or cut
- Growth pattern — whether mushrooms are single, scattered, or growing in clusters
These observations, combined with your photographs, form the foundation of strong, reliable mushroom identification—whether you’re reviewing your find at home or sharing it online with others.
The MMS Field Data Slip is a helpful tool for foragers to organize observations, keep specimens separate, and ensure that the correct details are recorded at the right time. For more information on how to use a Field Data Slip and to download them for your own use, visit the How to Use the MMS Field Data Slip page. For scientific purposes, use a slip provided by the Funga Scientific Committee.
Collecting the Mushroom
Once you’ve taken your photos and noted the surrounding habitat, you’re ready to remove the mushroom from its location. Before collecting, be sure you understand the rules for the land you are on. Collecting guidelines vary by location and land manager, and following local regulations helps protect fungal populations and maintain good relationships with conservation partners and land agencies.
When possible, collect the entire fruiting body, including the base. Many important identification features are found at or below the soil surface and are easy to miss if the mushroom is cut too high. A clean, complete specimen provides the most accurate picture of what you’ve found. There are a few situations where collecting the entire mushroom does not make sense. Large, slow-growing fungi such as polypores often do not require full removal for identification, and taking the whole specimen can have a greater impact. In these cases, careful documentation or collecting a small portion is usually sufficient.
Handle the mushroom gently as you remove it. Many species bruise, discolor, or break apart easily, so a light touch helps preserve the details you’ll want to examine later. Once collected, keep each specimen separate in a wax paper bag, foil wrap, paper envelope, or small box. Avoid plastic bags, which trap moisture and quickly cause mushrooms to soften or rot. Separating specimens prevents them from sharing moisture, spores, or odors and helps keep each specimen in good condition for identification at home.
At Home
Once you’re home, keep your specimens organized so the details you recorded in the field remain clear. Use your photos, notes, and full specimen to complete the identification process. Only when a mushroom is confirmed with absolute certainty should it move into the “edible” category.
Finishing Identification
If you brought home mushrooms you still want to identify, keep each specimen separate with its notes or field slip. Look them over again in good light and revisit the same features you examined in the field—the cap, underside, stem, and base. Some species show bruising or color changes that appear slowly, so note anything that develops over the next few hours.
Identification often becomes easier once you’re home with your photos, notes, and time to compare details. Many people use a combination of trusted field guides, regional mushroom books, and online resources to narrow things down. Uploading your photos to communities like iNaturalist or Mushroom Observer can also provide helpful input from others who have experience with similar species.
You’re never expected to identify everything on your own. MMS regularly hosts meetings, forays, and ID-focused gatherings where members bring in fresh specimens, compare features, and work through identifications together. These events are a great way to learn, see more species, and build confidence in your ID skills.
Making a Spore Print
At home, you may want to make a spore print as part of the identification process. Spore color is a critical identifying feature for some mushrooms and can help confirm or rule out lookalike species.
To make a spore print, remove the stem and place the cap gill-side down on a surface that shows contrast, such as half white and half black paper, or aluminum foil. Cover the cap with a bowl or container to reduce airflow and leave it undisturbed for several hours or overnight. When you lift the cap, the deposited spores reveal their color.
Spore prints are especially useful when distinguishing between visually similar mushrooms. For example, Galerina species produce a rusty brown spore print, while Flammulina (velvet foot or enoki) produces a white spore print. In cases like this, spore color can be essential for confident, safe identification.
Storing Edible Mushrooms
For mushrooms confirmed edible with 100% certainty, simple storage steps keep them fresh:
- Place mushrooms in paper bags to prevent moisture buildup.
- Store them in the main refrigerator compartment where air moves freely.
- Keep different species separate and avoid stacking them tightly.
- Check them daily for moisture, softness, or odor changes.
Firm species tend to store well for a few days. Delicate mushrooms benefit from extra airflow and should be used sooner. For more extended storage, mushrooms can be sautéed and frozen, dried in a dehydrator, or frozen raw if the species is known to tolerate it. Always cook wild mushrooms thoroughly before eating.
Contributing to MMS Scientific Work
If you plan to preserve specimens for scientific use, dry them at low heat, around 95–115°F, until they are “cracker dry.” Keep each specimen matched to its slip or notes so it remains traceable. Store dried mushrooms with their corresponding field slips to keep everything matched. If you upload your observation to iNaturalist or Mushroom Observer, write the observation ID on your slip. For more detailed scientific collecting guidance and information on species of conservation interest, visit the MMS Funga Scientific Committee and Rare Fungi page.